Exploring the American Manicure: What It Is and How to Get It

Exploring the American Manicure: What It Is and How to Get It

The beauty industry is constantly evolving, and new trends are emerging every day. One of the latest trends to take the world of nails by storm is the American Manicure. While it may sound similar to the French Manicure, there are some key differences that set the two apart.

In this article, we will delve into what an American Manicure is, the key differences between it and a French Manicure, and how you can achieve the perfect American Manicure look.

What is an American Manicure?

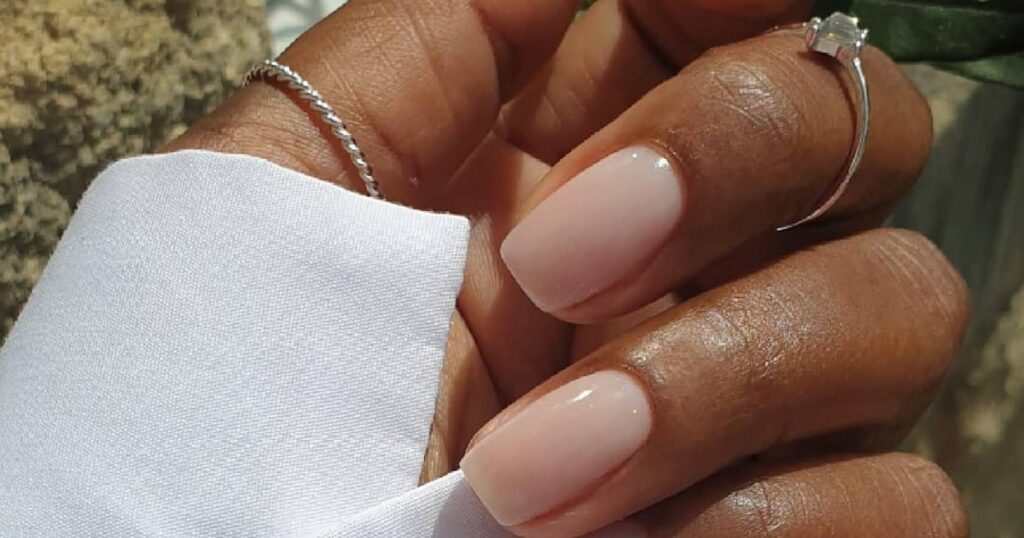
An American Manicure is a type of nail treatment that involves shaping and polishing the nails in a way that appears natural and understated. The aim of this type of manicure is to create a clean, well-groomed appearance that looks polished and professional. American Manicures have become increasingly popular in recent years, thanks to their simplicity and versatility.

The Key Differences Between American and French Manicures:

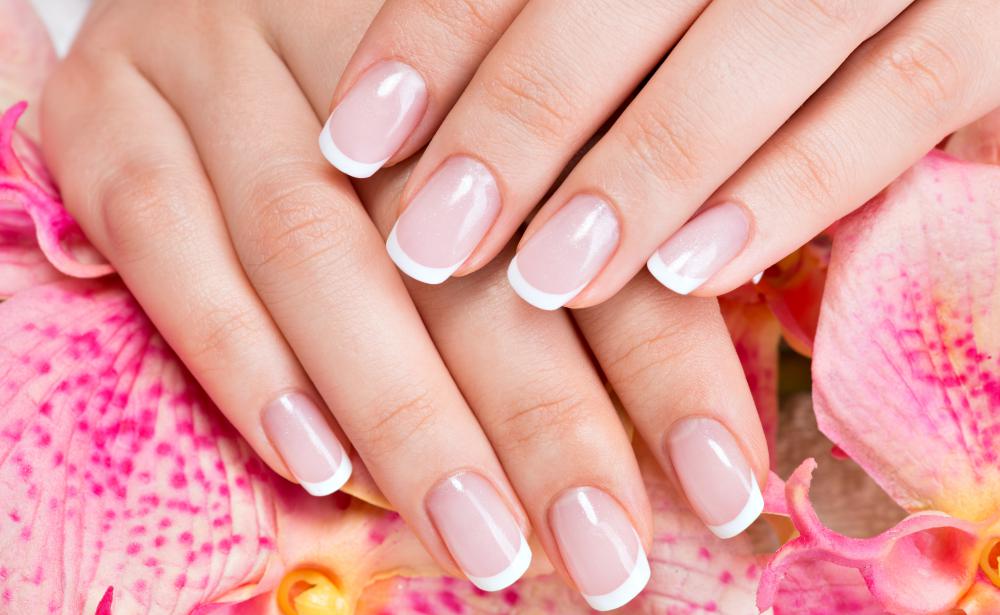
While the two styles may sound similar, there are some key differences between American and French Manicures that set them apart. One of the main differences is the shape of the nail tip. French Manicures typically have a more pronounced tip that is squared off, while American Manicures have a slightly rounded tip that is more natural-looking.

Another difference is the color of the polish used for the tip of the nail. In a French Manicure, the tip is usually painted with a stark white polish, while an American Manicure uses a more subtle shade that closely matches the color of the nail bed.

Finally, the thickness of the line used to separate the tip of the nail from the rest of the nail bed is typically thinner in an American Manicure than in a French Manicure. This gives the American Manicure a more natural, blended look.
Exploring the American Manicure: What It Is and How to Get It

How to Achieve the Perfect American Manicure:

If you’re interested in achieving the perfect American Manicure, the good news is that it’s relatively easy to do at home. Here are the steps you’ll need to follow:

Step 1: Start by cleaning and shaping your nails. Use a nail file to shape them into a slightly rounded tip and gently buff them to create a smooth surface.

Step 2: Apply a base coat to your nails to protect them and ensure the polish goes on smoothly.

Step 3: Choose a polish color that closely matches the color of your nail bed. Apply two coats of polish, allowing each coat to dry fully before applying the next.

Step 4: Once the polish is dry, use a slightly lighter shade of polish to paint the tips of your nails. You can use a special nail stencil or a steady hand to create a rounded tip.

Step 5: Finally, apply a top coat to protect the polish and give your nails a glossy finish.

The American Manicure is a popular nail trend that is perfect for those who want a natural and understated look. While it may share some similarities with the French Manicure, there are some key differences that set the two apart. With a little bit of practice, it’s easy to achieve the perfect American Manicure at home, giving your nails a polished and professional appearance that is sure to turn heads.


American Manicure Variations:

While the classic American Manicure involves a nude or natural base color with a soft white tip, there are many variations that you can try. You can use different colors for the tip or even add glitter or other embellishments to create a more unique look. Some people also prefer a slightly longer, more tapered nail shape for their American Manicure.

American Manicure vs. Gel Manicure:

Gel manicures have become very popular in recent years, but how do they compare to American Manicures? The main difference between the two is the longevity of the polish. Gel manicures typically last for 2-3 weeks, while American Manicures may start to chip or fade after a week or so. However, American Manicures are easier to remove at home and don’t require a UV lamp like gel manicures do.

Maintaining Your American Manicure:

To keep your American Manicure looking its best, there are a few tips you should keep in mind. Firstly, it’s important to apply a top coat every few days to prevent chipping and maintain the glossy finish. You should also avoid using your nails as tools and wear gloves when doing household chores or other activities that could damage your nails.

The American Manicure is a versatile and understated nail trend that is perfect for those who want a polished and professional look. With a little bit of practice and the right tools, it’s easy to achieve the perfect American Manicure at home. Whether you prefer a classic nude and white color combination or want to experiment with different colors and designs, there’s no limit to the ways you can customize this popular nail trend.

Everything You Need To Know About The Modern Hair Perm
Everything You Need to Know About the Modern Hair Perm

Gone are the days when perms were synonymous with tight, frizzy curls of the 80s. Today’s perms have evolved, offering a wide range of styles from loose waves to defined curls, tailored to suit every hair type and preference. This transformation has debunked many misconceptions about perms being damaging or limiting in style. The modern perm is here to offer versatility, minimal upkeep, and long-lasting texture. Understanding the Perm Process The perm process involves using chemicals to break down and then reform the hair’s disulfide bonds, which determine its shape. The solution’s composition and the neutralizer play pivotal roles in this transformation, ensuring the desired curl is achieved without compromising hair health. Types of Perms Today’s market offers a variety of perms: Cold perms give traditional tight curls, while hot perms create softer, more natural waves.Digital and ceramic perms use advanced technology to offer more defined curls with less damage.Root and partial perms add volume and texture to specific areas, catering to individual style needs.Choosing the Right Perm for Your Hair Type Selecting the correct perm type is crucial for achieving the desired outcome without damaging the hair. Factors like hair texture, health, and personal maintenance capabilities should guide your choice, in consultation with a professional stylist. Pre-Perm Preparation Proper preparation involves assessing hair health and preparing it for the chemical process. Understanding the commitment perms require in terms of lifestyle and maintenance is also crucial at this stage. The Perm Procedure Explained The perm process varies slightly between types but generally follows a similar pattern. Understanding the steps involved can help set realistic expectations for the duration and results of the salon visit. Post-Perm Hair Care Maintaining a perm involves adopting a hair care routine that includes hydrating and curl-defining products. Proper care can significantly extend the lifespan of your perm. Common Perm Myths Debunked Modern perms are designed to minimize damage and offer a range of styling options. Addressing common myths can help alleviate concerns related to hair health and versatility. Perm Maintenance and Troubleshooting Even with the best care, perms can encounter issues like frizz or loss of definition. Knowing how to manage these problems or when to seek professional advice is key to maintaining your perm. Modern Perm Inspirations Looking to celebrities and trendsetters can provide inspiration for your perm. Adapting these styles to fit your personal look can make your perm truly unique. DIY Perms vs. Professional Perms While at-home perm kits are available, professional perms are recommended for their expertise and access to higher-quality products. The risks associated with DIY perms often outweigh the benefits. The Future of Perms Innovations in perm technology continue to emerge, promising more sustainable and hair-friendly options. The future of perms looks bright, with a focus on health and environmental awareness. Embracing the modern perm means enjoying a versatile, low-maintenance hairstyle that can enhance your natural beauty. With the right preparation, care, and mindset, anyone can rock a perm tailored to their unique style.

4 Ways To Tell If Someone Has Blocked You On Instagram 1
4 ways to tell if someone has blocked you on Instagram

If you recently noticed that you can no longer see a certain person’s posts in your Instagram feed, it’s possible they simply haven’t posted anything in a while — or they may have blocked you. Instagram doesn’t notify you when you have been blocked, nor is there any comprehensive list of people that have blocked you that you can look at. Even so, if you suspect you have been blocked on Instagram, there are some steps you can take to find out if you’ve been blocked… GO TO THE NEXT PAGE TO CONTINUE…

The Ultimate Guide Toeyebrow Shaping
The Ultimate Guide to Eyebrow Shaping

Eyebrows significantly contribute to the symmetry and expressiveness of the face. Crafting the perfect eyebrow shape not only enhances your looks but also emphasizes your eyes and brings harmony to your facial characteristics. This guide aims to equip you with the essential knowledge of eyebrow shaping, offering insights into its significance and guiding you towards achieving your preferred eyebrow style. Deciphering Eyebrow Structure Grasping the natural structure of your eyebrows is the initial step towards effective shaping. This segment will elaborate on the critical components of the eyebrow and how to ascertain your inherent eyebrow shape, laying a solid foundation for a style that flatters your facial anatomy. Selecting Eyebrow Shaping Tools and Products The selection of appropriate tools is pivotal for successful eyebrow shaping. This guide will navigate you through the necessary grooming instruments, including tweezers, scissors, eyebrow pencils, and gels, advising on how to opt for the ones most suited to your needs. Eyebrow Shaping Preparation Adequate preparation enhances the ease and efficacy of the eyebrow shaping endeavor. This entails cleaning and priming your eyebrows as well as outlining the intended shape prior to initiating the shaping procedure. Eyebrow Shaping Methodologies We will delve into diverse eyebrow shaping strategies, such as trimming, tweezing, waxing, and threading, examining the advantages and drawbacks of each to assist you in selecting the method that aligns with your personal preferences and requirements. Step-by-Step Eyebrow Shaping Guide This section offers an exhaustive, stepwise tutorial on eyebrow shaping, from identifying the most flattering shape for your face to the execution of the shaping process, guaranteeing symmetrical and balanced eyebrows. Enhancing and Defining Eyebrows Post-shaping, filling in thin spots and defining your eyebrows can further improve their appearance. We will investigate various eyebrow enhancement products and techniques to achieve a refined and natural look. Customizing Eyebrow Shape Based on Face Type The optimal eyebrow shape may vary according to your face type. This part provides suggestions for customizing your eyebrow shape to complement your distinct facial features, whether your face is round, oval, or square. Eyebrow Shape Maintenance Preserving your eyebrow shape is essential for enduring appeal. This includes regular care, maintenance, and recognizing when professional assistance is necessary for touch-ups. Avoiding Eyebrow Shaping Faux Pas To achieve optimal outcomes, being cognizant of typical eyebrow shaping errors, like excessive plucking, is crucial. This advice aims to help you sidestep these mistakes and maintain healthy, well-defined brows. Eyebrow Shaping Trends and Inspiration Keep abreast of the latest eyebrow shaping trends and gather inspiration from prevalent styles and celebrities. This knowledge will aid you in selecting a style that matches your personal aesthetic while ensuring your eyebrows remain stylish. Elevating Your Eyebrow Aesthetics Mastering eyebrow shaping is a skill that significantly enhances your appearance and facial expressions. Armed with the appropriate tools, techniques, and maintenance practices, you can sculpt the ideal eyebrows to complement your face and accentuate your eyes. Patience and regular practice are essential to perfecting the art of eyebrow shaping. Frequently Asked Questions About Eyebrow Shaping

Exploring The World Of Microneedling Revitalize Your Skin
Exploring the World of Microneedling: Revitalize Your Skin

Microneedling has firmly established itself as a pivotal innovation in the realm of aesthetic and dermatological care. By inflicting minuscule injuries on the skin’s surface, it activates the body’s inherent healing mechanisms, catalyzing the generation of collagen and elastin. The outcome is a notable enhancement in skin texture, a reduction in scar visibility, minimized fine lines, and a complexion that radiates youthfulness and vitality. This comprehensive exploration will guide you through every aspect of microneedling, from its myriad benefits and the procedure itself to post-treatment care and frequently asked questions. Delving into Microneedling At its core, microneedling, or collagen induction therapy, utilizes slender needles to create almost imperceptible punctures on the skin’s uppermost layer. Renowned for its efficacy in refining the skin’s texture and tone, it is especially advantageous for mitigating scars, wrinkles, and enlarged pores, fostering skin renewal from within. The Scientific Foundation of Microneedling Microneedling’s underlying science is both straightforward and deeply rooted in biology. The microscopic injuries it induces prompt the body to initiate a healing response, which includes the production of new collagen and elastin. This response not only repairs the tiny wounds but also rejuvenates the adjacent skin that may be aged or damaged, resulting in a visibly rejuvenated appearance. The Advantages of Microneedling Device Varieties for Microneedling The market offers an array of microneedling devices, from professional-grade equipment found in clinics to home-use derma rollers. Professional treatments are generally more impactful, owing to the customizable depth of needle penetration and the intensity of the treatment. Preparing for a Microneedling Session The preparatory phase involves a consultation with a skincare expert to evaluate if your skin is suited for the treatment and to address any concerns. Avoiding certain medications and sun exposure prior to the session is advised. The Microneedling Process A standard session includes cleaning the skin, applying a numbing cream, followed by the microneedling procedure, which lasts about 30 minutes. Afterwards, a calming serum or mask may be applied to soothe the skin. Post-Treatment Care and Healing Post-treatment care is crucial for enhancing the benefits of the procedure. It involves the application of recommended serums or creams, avoiding sun exposure, and maintaining skin hydration. Safety and Potential Side Effects Microneedling is generally safe for all skin types, though some may experience redness, swelling, and sensitivity after the treatment, which usually subsides within a few days. Microneedling Across Different Skin Types This versatile treatment is suitable for a wide range of skin types and concerns, from aging to acne scars. Nonetheless, individuals with specific skin conditions should seek professional advice before proceeding. Enhancing Results with Combined Treatments For superior outcomes, microneedling can be paired with other treatments, such as PRP (Platelet-Rich Plasma) or hyaluronic acid serums, to augment the healing and rejuvenative effects. Cost Considerations and Choosing a Provider The expense of microneedling varies based on location, clinic, and treatment scope. Despite its growing accessibility, selecting a qualified provider is crucial for ensuring both safety and efficacy. Insights from Personal Experiences Testimonials from those who have experienced microneedling offer valuable perspectives and reassurance regarding the procedure’s…

Which Makeup Tool Is Right For You The Ultimate Guide To Makeuptools
Which Makeup Tool is Right for You? The Ultimate Guide to Makeup Tools

The artistry of makeup significantly benefits from the choice of tools, akin to how an artist’s masterpiece is influenced by their selected instruments. For novices embarking on their makeup voyage or professionals seeking to polish their skills, comprehending the vast array of makeup tools is paramount. Our objective is to clarify the makeup tool landscape, enabling you to choose wisely for your distinct beauty practices. Key Makeup Instruments A Comparison of Brushes and Sponges The decision between utilizing brushes or sponges for foundation is a prevalent quandary. Brushes are lauded for their precise application, excelling in the blending of both liquid and powder forms, whereas sponges are celebrated for delivering a flawless, airbrushed look, particularly with liquid foundations. Foundation Application Instruments A Spectrum from Brushes to Fingers A deep dive into foundation application tools unveils a plethora of choices, each with unique advantages. From the natural warmth of fingers facilitating blending, the precision afforded by foundation brushes, to the dewy sheen offered by sponges, every method brings something distinct to the table. Specialty Makeup Implements Eyeshadow and Eyeliner Tools The transformation of eyeshadow application lies in the appropriate selection of brushes. Ranging from soft, fluffy brushes for blending to precise pencil brushes, each is designed for crafting diverse eyelid looks. Eyeliner tools also vary, with pencils creating a smudged effect, and liquid liners providing a crisp, defined edge, each tool offering a path to achieve your envisioned eye makeup style. Innovative Makeup Implements From Silicone Sponges to Beauty Blenders Silicone sponges have emerged as a sanitary, easy-to-maintain choice for foundation application, minimizing product wastage while ensuring a smooth coverage. Beauty blenders, on the other hand, have transformed the application of foundation and concealer, ensuring an even, blended coverage. Their unique design facilitates precise application in challenging spots. Makeup Tools for Enhancing the Eyes Mascara Wands and Eyelash Curlers The design of a mascara wand is pivotal in achieving the desired lash effect, whether it’s for volume or length. Recognizing the various wand shapes is essential in picking the mascara that aligns with your goals. Eyelash curlers are indispensable for creating an uplifted, open-eyed appearance, with the trick lying in finding a curler that comfortably conforms to your eye shape. Facial Makeup Tools Contouring and Highlighting Brushes Contouring brushes, with their angled bristles, are engineered to replicate the face’s natural shadows, accentuating features like cheekbones and the jawline. Highlighting brushes aim to deposit shimmer on the face’s high points, such as cheekbones and brow bones, enhancing your glow. Lip Makeup Tools Brushes and Liners for Precision A lip brush is vital for exact lipstick or gloss application, offering edge control and the option to intensify color. Lip liners outline the lips and prevent color bleed, facilitating a precise lip edge or a blended look. Maintaining and Storing Makeup Tools Maintaining the cleanliness of your makeup tools is crucial for avoiding skin irritation and breakouts. This guide will discuss optimal practices for tool maintenance. Additionally, proper storage not only organizes your tools but also prolongs their lifespan, with innovative solutions ensuring cleanliness and accessibility….

The Butterfly Haircut: A Nostalgic Hairstyle From The Past
The Butterfly Haircut: A Nostalgic Hairstyle from the Past

The butterfly haircut was a popular hairstyle in the 1970s and 1980s. This hairstyle was characterized by short hair on the top and longer hair on the sides and back. The hair on the sides and back was often layered, giving the hair a flowing, butterfly-like appearance. This hairstyle was especially popular among women, but it was also worn by men. The butterfly haircut was often paired with a perm, which added volume and texture to the hair. The perm created curls or waves in the longer hair on the sides and back, while the shorter hair on the top was often styled with a slight wave or curl as well. This created a contrast in textures that added to the overall appearance of the hairstyle. The butterfly haircut was not just a hairstyle, but a cultural phenomenon. It was popularized by celebrities like Farrah Fawcett, who wore the hairstyle on the hit television show “Charlie’s Angels.” Fawcett’s hairstyle became so popular that it was named after her, and it became known as the “Farrah Fawcett hairstyle.” The butterfly haircut was also popular among African American women, who often wore the hairstyle with cornrows or braids on the sides and back. This created a unique look that combined traditional African American hairstyles with the popular butterfly haircut. Despite its popularity, the butterfly haircut eventually fell out of fashion. In the 1990s, shorter haircuts became more popular, and the perm fell out of fashion as well. However, the butterfly haircut remains a nostalgic hairstyle from the past, and it is still worn by some today. If you’re considering getting a butterfly haircut, there are a few things you should know. First, the haircut requires regular maintenance to keep it looking its best. The longer hair on the sides and back will need to be trimmed regularly to prevent split ends, and the shorter hair on the top will need to be styled to maintain its shape. Second, the butterfly haircut works best on those with straight or slightly wavy hair. If you have curly hair, you may need to straighten it to achieve the desired look. If you have very thick or coarse hair, you may need to have it thinned out to achieve the flowing, butterfly-like appearance. Finally, the butterfly haircut can be a great choice if you’re looking for a nostalgic hairstyle that harkens back to the 1970s and 1980s. It’s a fun and playful hairstyle that can add a touch of whimsy to your look. Whether you’re wearing it with a perm or without, the butterfly haircut is sure to turn heads and make you stand out in a crowd. In conclusion, the butterfly haircut is a hairstyle that has stood the test of time. Although it may no longer be as popular as it once was, it remains a nostalgic hairstyle from the past that is still worn by some today. If you’re considering getting a butterfly haircut, be sure to do your research and talk to your hairstylist to make sure it’s the right choice for you. With…

The Ultimate Guide To Cream Blush: How To Use, Choose And Apply
The Ultimate Guide to Cream Blush: How to Use, Choose and Apply

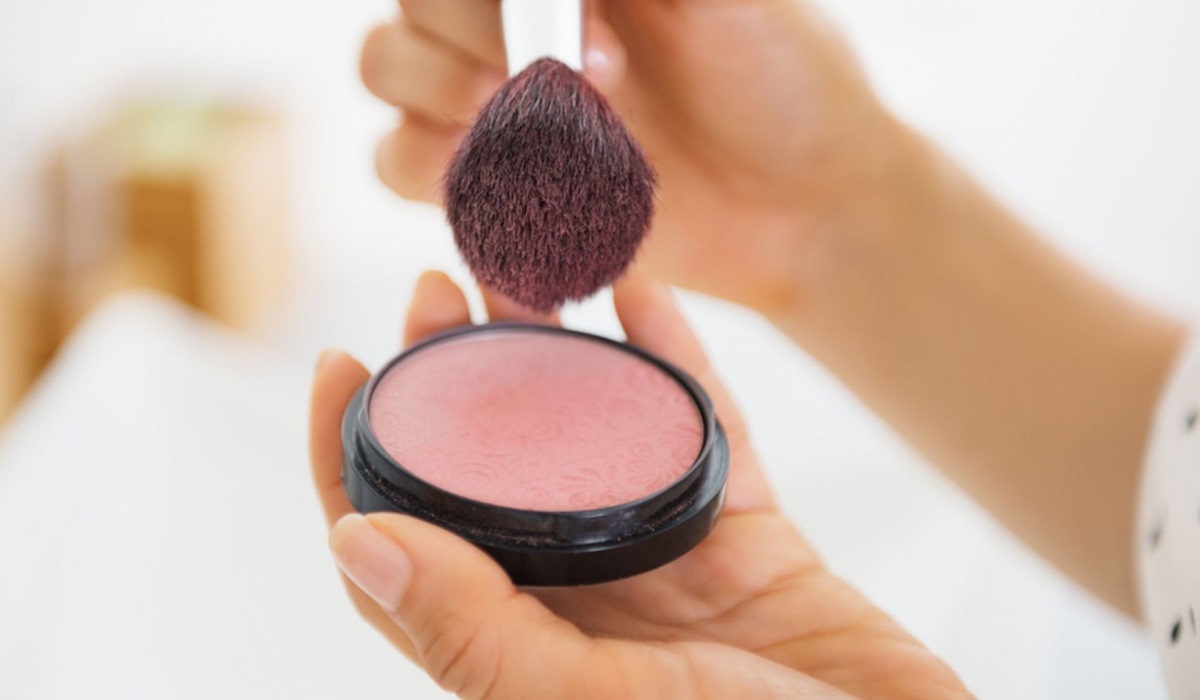
Cream blush has been gaining popularity in recent years, thanks to its ability to provide a natural, dewy glow to the cheeks. Unlike powder blushes, cream blushes have a creamy, emollient texture that blends effortlessly into the skin, giving a soft and seamless finish. In this guide, we’ll explore everything you need to know about cream blush, including how to choose the right shade for your skin tone, how to apply it, and some of the best cream blushes on the market. Why Choose Cream Blush? Cream blushes have many benefits over their powder counterparts. Here are just a few: Natural Finish: Cream blush gives a natural-looking flush to the cheeks, as it blends seamlessly into the skin. It’s perfect for those who want a subtle, understated look. Hydrating: Cream blushes contain moisturizing ingredients that keep the skin hydrated and glowing. This is especially beneficial for those with dry skin, as it can help to prevent flakiness and enhance the overall appearance of the skin. Versatile: Cream blush can be used not just on the cheeks, but also on the lips and eyes. This makes it a versatile product that can be used for a range of looks. How to Choose the Right Shade of Cream Blush? Choosing the right shade of cream blush is important to ensure that it looks natural and complements your skin tone. Here are some tips to help you choose the right shade: Skin Undertones: Determine your skin’s undertones, whether it’s warm, cool or neutral. Warm skin tones look best with peachy or golden shades, while cool tones look great with pink or berry shades. Neutral skin tones can pull off a wider range of shades. Depth of Shade: Consider the depth of the shade you’re choosing. If you have fair skin, lighter shades like baby pink or peach will look best. If you have medium skin, opt for shades that are more saturated and pigmented. For deeper skin tones, rich shades like brick or berry will look best. Consider Your Makeup Look: Think about the overall makeup look you’re going for. If you’re going for a natural, no-makeup look, a subtle pink or peachy shade would be perfect. If you’re going for a more dramatic look, a brighter or deeper shade would be more suitable. How to Apply Cream Blush? Applying cream blush is simple and easy. Here’s how to do it: Preparation: Start by prepping your skin with moisturizer and primer to create a smooth, even base. Application: Using your fingertips or a makeup sponge, apply a small amount of cream blush to the apples of your cheeks. Start with a small amount, and build up as needed. Blend: Use your fingers or a sponge to blend the blush into your skin, ensuring that there are no harsh lines or streaks. Set: Once you’re happy with the application, set the blush with a light dusting of powder to ensure it lasts all day. Final Thoughts Cream blush is a versatile and easy-to-use product that can give a natural, radiant glow to the cheeks. When choosing…

Eat Your Mane, Love Your Tresses Healthyhair Habits Nourishing Your Locks
Eat Your Mane, Love Your Tresses: Healthy Hair Habits: Nourishing Your Locks

Welcome to the definitive guide to obtaining healthy and gorgeous hair which stands out with strength and vitality. This particular article discusses essential nutrients, strategies for enhancing hair health, natural cures, and styling tricks to boost your mane. Understanding Hair Structure and Growth CycleThe structure of hair and how hair grows are crucial before beginning hair care habits. Hair Anatomy: Investigate the follicle, shaft, and cuticle to learn just how the various areas of hair wellness function.Phases of Hair Growth: Find out about the 3 phases of the hair regrowth cycle – telogen, catagen, and anagen – and how each stage affects hair length, thickness, and shedding.Things That Influence Hair Growth: Find out what factors effect growth of hair, from hormones and genes to nutrition, environment and stress.Common Hair Issues: Determine common hair problems such as thinningness, brittleness, split ends & hair loss and discover the main cause & treatment. Nutrients Your Hair NeedsFood is crucial for good hair. Let us explore the key nutrients required for promoting hair health from inside. Protein: Understand the significance of protein for hair growth & growth and the foods you consume which have it – lean meats, dairy, eggs, fish, poultry, nuts and legumes.Vitamins: Go over the role of vitamins A, C, E and also the B complex vitamins (Biotin, B5, B6, B12) on growth of hair, follicle power and protection against harm.Minerals: Minerals like iron, magnesium, selenium, and zinc are crucial for the scalp, growth of hair and baldness. Omega 3 Fatty Acids: Get the facts on omega 3 essential fatty acids from fatty fish, walnuts and flaxseeds for healthy scalp, decreased inflammation, along with glossy hair.Water: Hydrate your hair for all around hair wellness; drying away makes for dry, brittle hair and thinning scalps. Drink a minimum of eight glasses of water daily for optimum drinking water. Healthy Hair Care PracticesGood hair demands gentle, gentle hair treatment regimes which promote scalp wellness, hydration & resiliency. Gentle Cleansing: Make use of a gentle, sulfate-free shampoo to wash your scalp and hair; rub the scalp to eliminate product buildup, oil, and dirt while staying away from overwashing (which may strip skin oils and cause dryness). Moisturizing & Conditioning: Observe with a moisturizing conditioner to rehydrate, clean out tangles and also give your hair back its silky shine & manageability – apply straight to your lengths and ends while staying away from the scalp for greasiness.Scalp Care: Observe scalp wellness: exfoliate regularly to eliminate dead skin cells and product buildup, stimulate blood circulation with scalp massages, and also add scalp therapies with ingredients including tea tree oil or salicylic acid to treat dandruff, inflammation or itching.Protection for Heat Styling: Cut back on heat damage with heat protectant aerosols or serums prior to applying heat styling tools like hair dryers, flat irons or even curling wands and always use lower heat settings for split ends and breakage.Staying away from Overprocessing: Reduce chemical treatments which bleach, color, perm or even straighten the hair to prevent cuticle irritation and also to avoid breakage, brittleness and loss of hair.Trimming: Regular:…