Decoding Undertones: Understanding How Vein Color Can Indicate Your Skin Undertone

Decoding Undertones: Understanding How Vein Color Can Indicate Your Skin Undertone

When it comes to finding the perfect makeup shades, hair colors, or clothing that flatter your complexion, understanding your skin’s undertone is key. While determining your undertone may seem like a daunting task, there is a simple method that can offer valuable insights: examining the color of your veins. The veins on your wrist can provide clues about your skin undertone, helping you make informed choices when it comes to beauty and fashion. In this article, we will delve into the correlation between vein color and undertone, explore the different undertone categories, and provide practical tips on how to determine and embrace your undertone to enhance your overall appearance.

Understanding Undertones:

Undertone refers to the underlying color that shines through your skin, regardless of its surface tone (fair, medium, or deep). It is categorized into three main types: cool, warm, and neutral.

Cool Undertone:
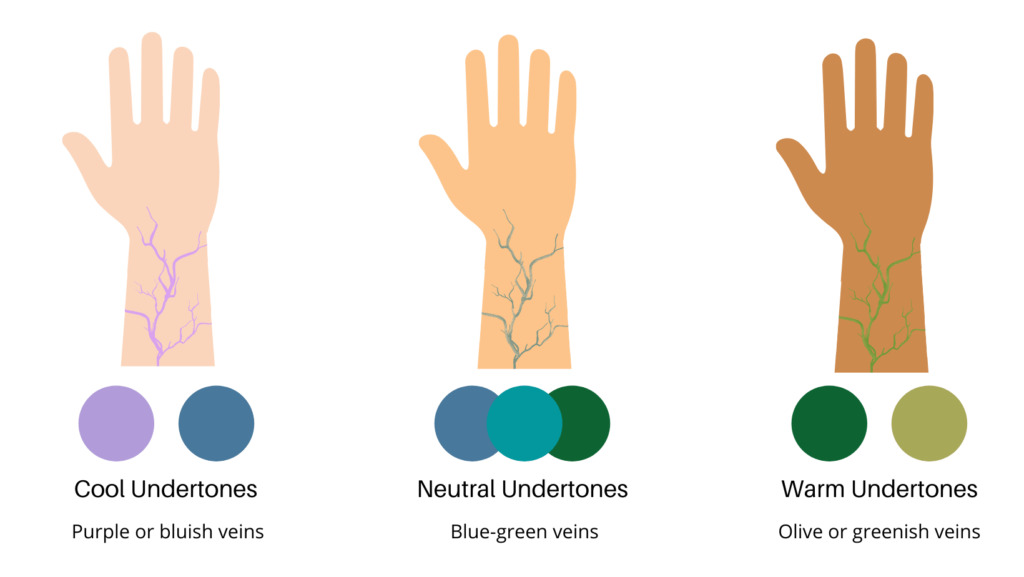
If you have a cool undertone, your skin may have hints of pink, red, or blue. People with cool undertones often have veins that appear bluish or purple on their wrists. Cool undertones are commonly associated with fair or light skin, but they can also be present in medium and deep skin tones.

Warm Undertone:
A warm undertone typically has undertones of yellow, peach, or golden hues. Veins on individuals with warm undertones may appear greenish or olive. Warm undertones are commonly found in people with golden or olive skin tones, but they can also be present in fair or deep skin tones.

Neutral Undertone:
A neutral undertone indicates a balance between cool and warm tones. Veins of individuals with neutral undertones may appear blue-green or a mix of blue and green. Neutral undertones are versatile and can suit a range of skin tones, from fair to deep.

Determining Your Undertone Using Vein Color:

To determine your undertone based on the color of your veins, follow these steps:

Find natural light: Look for natural lighting or step outside to ensure accurate color perception.

Examine your wrist: Observe the veins on the inside of your wrist or the underside of your forearm. Pay attention to their color and appearance.

Cool Undertone: If your veins appear bluish or purple, you likely have a cool undertone.

Warm Undertone: If your veins appear greenish or olive, you likely have a warm undertone.

Neutral Undertone: If your veins appear blue-green or a mix of blue and green, you likely have a neutral undertone.
Decoding Undertones: Understanding How Vein Color Can Indicate Your Skin Undertone

Applying Your Undertone Knowledge:

Understanding your undertone can guide your choices in various aspects of beauty and fashion:


Foundation and Concealer:
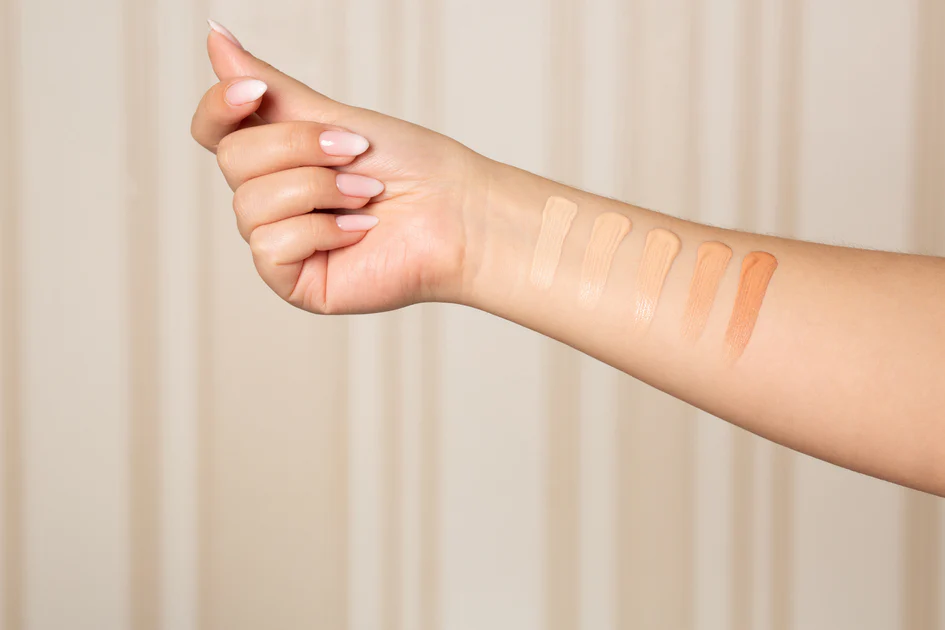
Knowing your undertone is crucial for selecting the right foundation and concealer shades that will blend seamlessly with your skin. Cool undertones are complemented by foundations with pink or neutral undertones, while warm undertones benefit from foundations with yellow or golden undertones. Neutral undertones can typically wear a range of shades from different undertone families.

Lipstick and Blush:
When choosing lipsticks and blushes, consider your undertone to find shades that enhance your natural beauty. Cool undertones tend to suit berry, pink, and blue-based red shades, while warm undertones can opt for coral, peach, and warm red tones. Neutral undertones can experiment with a wide range of colors and find what works best for them.

Hair Color:
Understanding your undertone can help you select the most flattering hair color. Cool undertones tend to suit shades like ash blonde or cool brunette tones, while warm undertones can enhance their features with golden or.
caramel hues. Neutral undertones have the flexibility to experiment with a wide range of hair colors, from warm to cool tones.

Clothing:
Your undertone can also guide your clothing choices. Cool undertones often look fantastic in jewel tones like sapphire blue, emerald green, and royal purple. Warm undertones can rock earthy tones like mustard yellow, burnt orange, and olive green. Neutral undertones have the freedom to wear both cool and warm tones and can experiment with a variety of colors.

Jewelry:
Consider your undertone when selecting jewelry to enhance your overall look. Cool undertones tend to be flattered by silver, platinum, and white gold metals, while warm undertones can shine with gold and rose gold. Neutral undertones can effortlessly mix and match metals.

Embracing Your Undertone:

Understanding your undertone is not about limiting your choices but rather empowering you to make choices that enhance your natural beauty. It’s important to note that these guidelines are not rigid rules, but rather suggestions to help you navigate the vast array of color options.

Additionally, it’s worth mentioning that some individuals may have a mix of undertones or fall in between categories. In such cases, it’s best to trust your own perception and experiment with different shades to determine what suits you best.



The Essential Benefits Ofeye Care Masks
The Essential Benefits of Eye Care Masks

The pursuit of personal wellness and self-care has led to the rediscovery and appreciation of traditional and innovative health aids. Among these, eye care masks stand out as a versatile and effective means to protect, nourish, and rejuvenate the delicate skin around the eyes, as well as addressing various aspects of visual and mental health. This detailed guide delves into the numerous advantages of eye care masks, offering insights on how their regular use can become a cornerstone of your wellness routine. Decoding Eye Care Masks Eye care masks, with their varied designs and functionalities, cater to a broad spectrum of needs, from enhancing sleep to mitigating visual discomfort. They range from gel-filled masks, which can be used hot or cold, to heated masks that soothe dry eyes, and sleep masks that ensure darkness for a restful night. Understanding the specific benefits and uses of each type of mask is the first step in harnessing their full potential. Gel Masks: Cooling Comfort and Warm Relief Gel masks serve a dual purpose. Chilled, they are perfect for reducing inflammation, puffiness, and the discomfort of allergies, acting as a quick refreshment for tired eyes. Warmed, they promote blood circulation, speeding up recovery from eye strain and facilitating relaxation. This versatility makes gel masks an indispensable tool in eye care, blending comfort with therapeutic benefits. Heated Masks: The Soothing Embrace In our digital age, heated eye masks have become invaluable for those battling dry eye syndrome, a direct consequence of prolonged exposure to screens. The gentle, consistent warmth encourages tear production, alleviating the discomfort of dryness. Beyond physical relief, the warmth of these masks relaxes the facial muscles, easing stress, and setting the stage for a peaceful night’s sleep. Sleep Masks: Guardians of Your Sleep Cycle Sleep masks are more than just barriers to light; they are instruments for enhancing sleep quality. By simulating darkness, they signal the brain to produce melatonin, the hormone responsible for sleep cycles, helping you achieve deeper and more restorative sleep. For anyone living in brightly lit environments or struggling with sleep quality, a sleep mask is an essential tool for health and well-being. Visual Health Benefits: Beyond the Surface The regular use of eye care masks addresses the immediate effects of digital eye strain, including dryness, redness, and general discomfort. These symptoms, if left unchecked, can lead to more significant eye health issues over time. Moreover, the preventive care provided by these masks can slow the signs of aging around the eyes, preserving the skin’s youthful appearance and vitality. Mental and Physical Wellness: The Broader Impact The act of applying an eye mask can become a ritual of self-care, signaling the body to transition into a state of relaxation and recovery. Heated and weighted masks, in particular, can mimic the comforting pressure of a gentle hug, reducing anxiety and promoting a sense of well-being. This holistic approach to health recognizes the interconnectedness of physical comfort, mental calm, and emotional stability. Incorporating Eye Care Masks into Your Routine Selecting the right eye care mask is a personal journey, dependent on…

Unlocking The Secrets Key Ingredients In Hair Growth Shampoos 2
Unlocking the Secrets: Key Ingredients in Hair Growth Shampoos

Introduction: Unlocking the Secrets to Beautiful Locks As individuals strive for luxurious locks, many turn to shampoos designed specifically to stimulate growth. In this comprehensive examination of such treatments, specialized shampoos will be examined along their key ingredients and their potential impact in helping transform tresses. Chapter 1 : Understanding Hair Growth Shampoos (PDF Download). Before engaging in hair growth shampoo research, it is crucial to gain an understanding of the natural hair growth cycle. Anagen, catagen and telogen phases make up this natural cycle which governs its development as it transitions and rests periods; hair shampoos aim to accelerate anagen phase hair growth to promote active development. Dihydrotestosterone, or DHT for short, has long been suspected as being linked with hair loss and certain shampoos use DHT reduction agents as preventive measures against further hair thinning or loss. Dihydrotestosterone (DHT), one of the key molecules involved in hair biology, plays an integral part. While DHT plays an integral part in normal bodily processes and in dealing with issues related to hair health issues such as hair thinning or loss. Understanding its subtle impact is crucial when trying to find solutions. DHT, or dihydrotestosterone (DHT for short), is a derivative of testosterone hormone found both men and women at varying concentrations. While DHT plays an essential part during puberty in contributing to male secondary sexual characteristics development, its relationship with hair follicles can prove both rewarding and hinderful at once. The hair growth cycle comprises three distinct phases: anagen (growth), catagen (transition), and telogen (resting). Each hair follicle undergoes this cycle independently to ensure continual renewal process – however when DHT enters the picture it can disrupt this natural cycle, and lead to its disruption. Problems occur when hair follicles are genetically predisposed to respond negatively to DHT, leading to exposure leading to miniaturization; which involves gradual shrinkage of follicles over successive hair cycles and eventually leading to cessation in new hair production. DHT can contribute to both miniaturization and inflammation within the scalp, leading to conditions like androgenetic alopecia – commonly referred to as male-pattern or female-pattern baldness – through its effects on hair follicle health resulting in faster hair loss rates. These reactions further compromise follicle health leading to further hair follicle decline thereby hastening hair loss further. Understanding DHT’s place in hair growth becomes critical when searching for solutions to its effects. Hair growth shampoos typically contain ingredients designed to counteract its influence; compounds like saw palmetto extract may even inhibit DHT production – providing another avenue against hair loss or at least slowing its rate of decline. Acknowledging DHT’s role can provide us with the ability to take an individualized approach towards treating specific concerns about hair health and maintenance. From DHT-blocking ingredients to comprehensive regimens, understanding its impact opens doors for tailored solutions designed to restore and nourish tresses with exceptional health and shine. Chapter 2: Essential Components in Hair Growth Shampoos Key Ingredients in Hair Growth Shampoos: Nourishing the Scalp for Lush Locks Individuals looking for lush locks often turn to hair growth shampoos in search…

How To Apply Matte Foundation If You Have Dry Skin: Tips And Tricks
How to Apply Matte Foundation if You Have Dry Skin: Tips and Tricks

Matte foundation is a popular makeup product that can help create a flawless, shine-free complexion. However, if you have dry skin, applying matte foundation can be challenging. The wrong application technique can make your skin look flaky, cakey, and accentuate dry patches. In this article, we will discuss how to apply matte foundation if you have dry skin, including tips and tricks to help you achieve a beautiful, long-lasting matte finish. Start with a Good MoisturizerBefore applying any makeup, it’s essential to prepare your skin by moisturizing it. When you have dry skin, it’s crucial to choose a rich, hydrating moisturizer that will help plump up your skin and create a smooth canvas for your foundation. Look for moisturizers that contain ingredients like hyaluronic acid, glycerin, and ceramides that can help retain moisture and prevent water loss. Apply the moisturizer to your face and neck and wait a few minutes for it to fully absorb into your skin before applying foundation. Prime Your SkinAfter moisturizing, apply a primer to your face. Primers can help smooth out your skin, blur imperfections, and create a barrier between your skin and the foundation. When you have dry skin, look for a hydrating primer that contains ingredients like glycerin or dimethicone that can help lock in moisture. Avoid primers that contain alcohol or fragrances that can further dry out your skin. Apply the primer evenly to your face, focusing on areas where you have dry patches. Choose the Right FoundationWhen you have dry skin, it’s essential to choose a matte foundation that is specifically designed for dry skin types. Look for foundations that are labeled as “demi-matte” or “natural matte” that have a satin-like finish rather than a completely flat, matte finish. These types of foundations can help control shine while still providing a natural-looking finish that won’t accentuate dry patches. Avoid foundations that are labeled as “matte” or “powder” as these can be too drying for dry skin. Apply Foundation with a Damp SpongeOne of the best ways to apply matte foundation if you have dry skin is with a damp makeup sponge. Dampening the sponge can help prevent the foundation from clinging to dry patches and provide a more natural-looking finish. Start by dabbing a small amount of foundation onto the sponge, then apply it to your face using a bouncing motion. This technique can help blend the foundation seamlessly into your skin and prevent it from settling into fine lines or wrinkles. Build Up the CoverageWhen applying matte foundation to dry skin, it’s better to build up the coverage gradually than applying too much product at once. Start with a thin layer of foundation and gradually build up the coverage until you achieve your desired level of coverage. This technique can help prevent the foundation from looking too heavy or cakey, which can be a common problem when applying matte foundation to dry skin. Set with PowderAfter applying your matte foundation, it’s essential to set it with a translucent powder. Setting the foundation can help prevent it from transferring and increase its longevity….

Build Your Strength Harsh & Sculpted Female's Strength Training
Build Your Strength: Harsh & Sculpted: Female’s Strength Training

This is strength training at its finest: encouraging females to attain ripped abs and toned sculpted bodies so they can unleash their potential. This guide will explore the numerous advantages of strength training, dispel myths, and also provide suggestions for developing an excellent exercise program. Regardless if you are a complete novice or maybe a skilled lifter, go together on this journey to discover how strength training is able to alter the way women feel. The Benefits of Strength Training Strength training has several advantages for women – mental and physical. Exactly why any female must include strength training — from developing lean muscle mass to strengthening confidence and resilience. Physical Benefits: Routine strength training could tone muscles, help with bone density, and enhance general power and stamina. Additionally, it helps get rid of pounds of excess fat, improves metabolic rate and also raises body mass – which means you appear slimmer and fitter.Emotional Health Benefits: Strength training is not only about boosting physical strength – it is a psychological toughness boost. It instills discipline, self-belief and perseverance and also empowers females to face hurdles both inside and outside the gym. Why Women Should Strength Train Contradicting common misunderstandings, strength training is not only for males. Strength training may benefit women of all ages and physical fitness levels – from boosting sports performance to daily functional motions and lessening injury risk. Overcoming Common Misconceptions Typical myths regarding strength training must be cleared up before females begin lifting weights. We must bust these myths and also clear the record. Fear of Bulking: Lots of females worry that lifting weights can make them heavy and drop their womanly shape. The truth is, many females lack the hormonal profile necessary to build massive and heavy physiques naturally. Strength training helps sculpt lean, toned muscles, improving womanly curves and definition.Significance of Proper Form: A 2nd common misconception is the fact that strength training is about lifting heavy loads alone. However form and technique are vital for injury prevention and best outcomes. Focus on mastering proper form before increasing weight.Injury Prevention: A number of females might be worried about damage potential during strength training. Although injuries are able to happen with inadequate care, good strength training is able to lower injury risk by strengthening muscle tissues and strengthening bones. Setting Realistic Goals In strength training, you have to establish reasonable and attainable objectives. Whether you are planning to increase muscle, drop pounds of excess fat, or become more fit, setting SMART (Specific, Relevant, Achievable, Measurable, Time bound) goals can keep you motivated. What Types of Strength Training Strength training includes several different modalities which have varying advantages and challenges. Look into the various kinds of strength training to decide which approach meets your requirements and preferences. Resistance Bands: Resistance bands are a handy and flexible method to acquire strength and tone muscles, making them perfect for newcomers or maybe home gyms.Exercises with Bodyweight: No equipment? Not a problem! For building up and correcting functional movement patterns, weight exercises such as push-ups, squats and lunges are beneficial.Free Weights:…

Baby Born With A Deformed Face Was Abandoned At Birth
Baby born with a deformed face was abandoned at birth

Jono Lancaster was abandoned by his birth parents 36 hours after he was born because of his deformed face. Treacher Collins syndrome is caused by a genetic defect in the fifth chromosome, the gene that effects facial development. Jono doesn’t have any cheekbones, and his hearing is damaged because of it. But despite his sad start in life, God had a plan for this baby. The hospital where he was born contacted a woman named Jean and told her about the abandoned baby. According to the adoption service papers, Jono’s birth mother “was horrified by the child’s physical appearance and experienced no maternal bond. And 36 hours later… GO TO THE NEXT PAGE TO CONTINUE…

Brain Power Challenge

Welcome to the Ultimate IQ Challenge! Are you ready to test your limits? This IQ test is designed to push your analytical skills to their peak. You have 20 minutes to answer 20 carefully crafted questions. Did you know? The average IQ in the U.S. is 98. Can you prove you’re smarter than the average American? Push your boundaries and see where you stand. Challenge yourself and aim for the top! Start the Test

The Myth And Reality: Does Toothpaste Get Rid Of Pimples?
The Myth and Reality: Does Toothpaste Get Rid of Pimples?

Dealing with pimples, those unwelcome guests on your skin, can be frustrating and often prompts people to seek quick solutions. One such age-old remedy that has circulated for decades is the use of toothpaste to banish pimples overnight. It’s a notion that’s been passed down through generations, seemingly offering a simple and cost-effective solution to a common skin concern. But does toothpaste genuinely get rid of pimples, or is it just another skincare myth? In this comprehensive guide, we’ll explore the science behind acne, the ingredients in toothpaste, whether toothpaste can help with pimples, potential risks and drawbacks, and better alternatives for pimple management. Understanding Acne: The Basics Before delving into the toothpaste-pimple connection, let’s first understand what acne is and how it forms. The Science Behind Toothpaste Now, let’s take a closer look at toothpaste and its ingredients. Toothpaste is designed for oral hygiene and contains various components meant to clean and protect your teeth and gums. Common ingredients found in toothpaste include: The Toothpaste-Pimple Connection: Myth or Reality? The idea that toothpaste can help get rid of pimples likely stems from the perception that toothpaste contains ingredients with drying or antibacterial properties. However, the reality is more complex. The Risks and Drawbacks of Using Toothpaste on Pimples Before considering toothpaste as a pimple remedy, it’s crucial to understand the potential risks and drawbacks: Better Alternatives for Pimple Management If you’re dealing with pimples and seeking effective ways to manage them, there are several better alternatives to toothpaste: While the notion of using toothpaste as a quick fix for pimples has circulated for years, it’s important to approach this remedy with caution. Toothpaste is not formulated for skincare and can lead to skin irritation, redness, and discomfort. There are more effective and safer alternatives for managing pimples, ranging from over-the-counter acne products to prescription medications and healthy skincare habits. Remember that the effectiveness of pimple treatments can vary from person to person, and it may take time to find the best approach for your unique skin. Patience, consistency, and a gentle approach to skincare are key to achieving and maintaining clear, healthy skin. If your acne is severe or persistent, seeking the guidance of a dermatologist is advisable to develop a personalized treatment plan tailored to your needs.

The Ultimate Guide To Cleaning Your Makeup Brushes: Tips, Tricks, And Techniques
The Ultimate Guide to Cleaning Your Makeup Brushes: Tips, Tricks, and Techniques

Makeup brushes are an essential tool in any beauty routine. They help us achieve flawless and effortless makeup looks, whether we’re going for a natural or dramatic look. However, it’s important to note that these brushes need to be cleaned regularly to maintain their performance and longevity. Dirty brushes can harbor bacteria, oil, dirt, and dead skin cells that can cause breakouts and other skin problems. Cleaning your makeup brushes may seem like a daunting task, but it’s actually quite simple and easy to do. With the right tools and techniques, you can keep your brushes clean and in good condition for years to come. In this article, we’ll walk you through the step-by-step process of cleaning your makeup brushes, as well as some tips and tricks to make the process even easier. Step 1: Gather Your Supplies Before you start cleaning your makeup brushes, you’ll need to gather some supplies. Here are the things you’ll need: Gentle liquid soap or brush cleaner: You can use any gentle liquid soap or brush cleaner to clean your brushes. Avoid using harsh soaps or detergents as they can damage the bristles. Bowl or sink: You’ll need a bowl or sink to clean your brushes in. Make sure it’s clean and free from any dirt or debris. Towel: You’ll need a clean towel to dry your brushes on. Brush cleaning mat or glove (optional): A brush cleaning mat or glove can help you get a deeper clean on your brushes by helping to remove dirt and makeup residue. Step 2: Wet Your Brushes To start cleaning your makeup brushes, wet the bristles under running water. Make sure the water is lukewarm and not too hot or too cold. Hold the brush under the water with the bristles facing down, and avoid getting water on the metal part of the brush as it can loosen the glue that holds the bristles in place. Step 3: Clean Your Brushes Once your brushes are wet, it’s time to clean them. You can use a gentle liquid soap or brush cleaner for this step. Put a small amount of soap or cleaner into your palm or onto a brush cleaning mat or glove. Swirl the brush into the soap or cleaner, making sure to cover all the bristles. Gently massage the bristles with your fingers, working the soap or cleaner into the brush. If you’re using a brush cleaning mat or glove, use the textured surface to help remove any dirt or makeup residue. Step 4: Rinse Your Brushes After you’ve cleaned your brushes, rinse them thoroughly under running water. Make sure all the soap or cleaner is rinsed out of the bristles. Keep rinsing the brushes until the water runs clear. Step 5: Dry Your Brushes Once you’ve rinsed your brushes, it’s time to dry them. Gently squeeze the excess water out of the bristles, then reshape the bristles with your fingers. Lay the brushes flat on a clean towel and let them air dry. Avoid drying your brushes upright as the water can seep down into the…