A Comprehensive Guide to Cosmetic Expiration Dates

A Comprehensive Guide To Cosmetic Expiration Dates 2

Every beauty enthusiast knows the thrill of discovering that perfect lipstick shade or foundation match – but as their collection grows, so too does their question of how long these beauty treasures should remain safe to enjoy. In this extensive investigation into cosmetic expiration dates we reveal their mysteries by exploring their science, factors and importance – providing clarity into when your cosmetics expire and the necessary steps needed for safe storage.

Chapter 1: Expiration Dates Explained

Formula Complexity
Cosmetics contain multiple ingredients with their own chemical makeup. Together these contribute to texture, color, efficacy and shelf life – it is therefore crucial that one understands these formulations so as to properly predict expiration dates for products formulated using them.

Preservatives and Stability Enhancers

Cosmetic products often incorporate preservatives as an extra safeguard. These compounds inhibit bacteria and fungi growth to ensure its integrity; however, over time these preservatives may become less effective, leaving your product susceptible to contamination.

Chapter 2: Factors Affecting Cosmetic Shelf Life

Air and Light Exposure
Cosmetic storage environments play a pivotal role in their shelf lives. Direct exposure to air and light may result in oxidation that damages its color and consistency over time, so packaging that limits air contact or blocks UV rays helps preserve cosmetics for as long as possible.

Temperature and Humidity
Changes in both temperature and humidity play an integral part in degrading cosmetic formulations, with high temperatures potentially melting or separate products and excessive humidity encouraging mold or bacteria growth – proper storage practices must therefore be in place in order to mitigate such risks.

Chapter 3 : Understanding Expiration Dates

Skin Health Concerns
Exposing yourself to expired cosmetics poses potential threats to skin health. Bacterial contamination could result in irritation, redness or even infections; and its delicate balance disrupted, potentially impairing its performance and potentially leading to harm.

As cosmetics age, their efficacy diminishes over time, which may impair performance and leave users unhappy with results. Foundation may no longer meet your desired coverage expectations, mascara might clump more often and skincare-infused products may lose some or all of their intended benefits – therefore being aware of signs of expiration ensures the optimal product performance is reached.
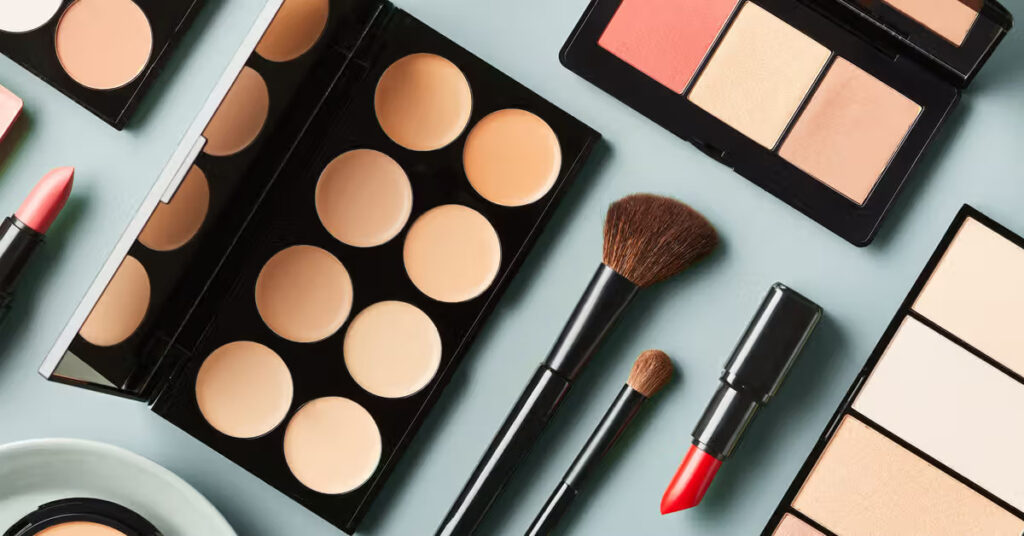
A Comprehensive Guide To Cosmetic Expiration Dates 1

Chapter 4: Deciding Which Expiry Dates Apply, on Different Products

Skincare Products Many skincare items, including creams, serums and cleansers, feature expiration dates that ensure maximum skincare benefits are realized over time. Antioxidants and retinoids in particular deplete their potency with time; adhering to timelines ensures maximum benefits are gained from skincare items purchased over time.

Eye Products
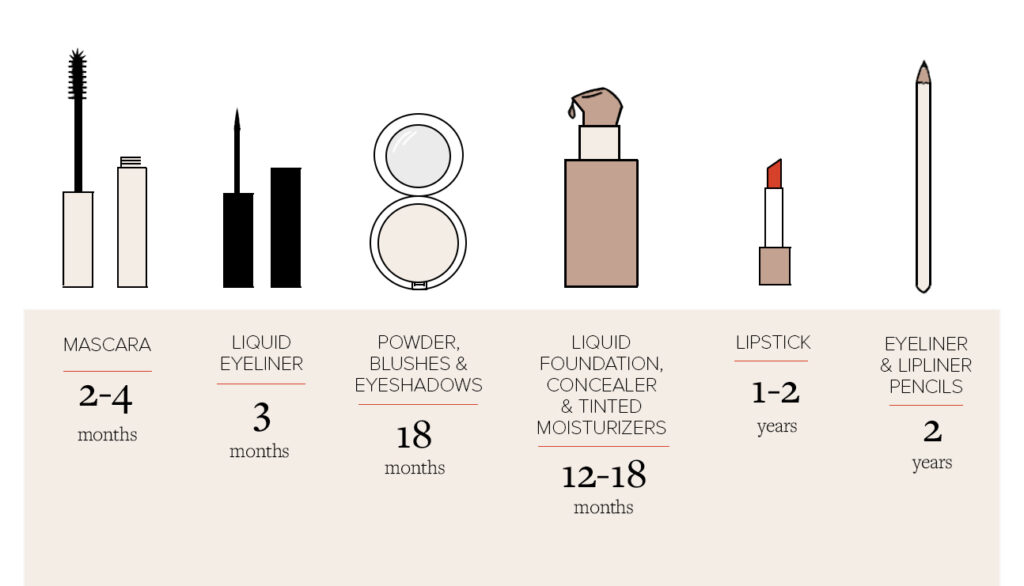
Due to the sensitive eye area, mascaras, eyeliners and eyeshadows have shorter shelf lives and should be changed out regularly in order to minimise risks of infection and ensure good eye health. Regular replacement, even of products which appear unopened is crucial for good vision health.

Chapter 5: Dispelling Myths About Makeup Perpetually: Addressing Common Misconceptions

Certain Makeup Products Are Long-Lasting
Powders and lipsticks have the tendency to last indefinitely; though longer shelf lives than liquid products exist. Color changes, texture shifts or scent fluctuations should prompt prompt their disposal as soon as they occur.

Professional and Personal Stashes


Makeup artists and enthusiasts can easily build up vast makeup collections, but both professionals and hobbyists must adhere to expiration dates in order to remain safe for clients; personal users should make sure their experiences remain pleasurable without risk.

Conclusion: Encouraging Beauty Choices

Expiration dates on cosmetics aren’t arbitrary numbers but rather important guidelines to maintain product quality and safeguard skin health. With knowledge about formulation, storage, and product-specific timelines at their fingertips, consumers can make more informed choices to make sure that their beauty routines are both glamorous and safe. Exploring expiration dates becomes an opportunity to curate an assortment that both looks fashionable while respecting wellbeing.

Banishing The Flakes: Effective Ways To Get Rid Of Dandruff
Banishing the Flakes: Effective Ways to Get Rid of Dandruff

Dandruff, those pesky white or yellow flakes that often appear on the scalp and can make their way onto your clothing, is a common condition that affects people of all ages. While it’s generally harmless, dandruff can be embarrassing and annoying. The good news is that there are numerous effective ways to combat dandruff, from simple home remedies to specialized dandruff shampoos and lifestyle adjustments. In this comprehensive guide, we will explore the causes of dandruff, the different treatment options available, and practical tips to keep your scalp flake-free. Understanding Dandruff: Causes and Contributing Factors Before diving into the remedies, it’s essential to understand what causes dandruff. Dandruff, scientifically known as “pityriasis simplex capillitii,” results from several factors, including: Now that we have a grasp of what causes dandruff let’s explore some effective ways to get rid of it. Home Remedies for Dandruff Over-the-Counter Dandruff Shampoos If home remedies aren’t providing relief, you can turn to over-the-counter (OTC) dandruff shampoos. These shampoos contain active ingredients that target dandruff and its underlying causes. There are three main types of OTC dandruff shampoos:

Perms: A Comprehensive Guide To The Timeless Hair Transformation
Perms: A Comprehensive Guide to the Timeless Hair Transformation

Perms, short for “permanent waves,” have been a popular hair transformation technique for decades, offering individuals a way to achieve beautiful, long-lasting curls or waves. This chemical hair treatment involves altering the natural structure of the hair to create texture and curl patterns that can last for several months. Perms have seen various trends and evolutions over the years, making them a timeless choice for those seeking to change their hairstyle. In this comprehensive guide, we will delve into the world of perms, exploring the different types, the process involved, aftercare tips, and the factors to consider before taking the plunge. What is a Perm? A perm is a chemical hair treatment that involves altering the hair’s internal structure to create curls or waves. It works by breaking and reshaping the disulfide bonds present in the hair, followed by setting the hair in the desired shape. The result is a semi-permanent transformation, with the curls or waves typically lasting for several months, gradually loosening as the hair grows. Perms are highly versatile and can be tailored to achieve various curl patterns, from loose beach waves to tight spiral curls. They offer a low-maintenance option for those looking to add volume, texture, and style to their hair without the need for daily heat styling. The Evolution of Perms The concept of perming hair has been around for centuries, but it gained significant popularity during the 20th century. The modern perm, as we know it today, was developed in the 1930s by Arnold F. Willatt, a British hairdresser. The process initially involved using harsh chemicals and heat, resulting in damage to the hair and an unnatural appearance. Over time, advancements in hair technology and the development of more gentle and effective perm formulations led to the evolution of perms. In the 1970s and 1980s, big, voluminous curls became the trend, and perms were a common choice to achieve this look. However, as the concept of “wash-and-go” hairstyles gained popularity, the demand for perms declined. In recent years, the perm has experienced a resurgence, with a focus on more natural and soft curl patterns. Beachy waves, loose curls, and textured hairstyles have become trendy, and perms have once again become a sought-after hair transformation option. Types of Perms The digital perm is a modern variation of the traditional perm, known for creating soft, natural-looking curls. It involves the use of digitally controlled rods to create consistent and uniform curls. Digital perms are ideal for those seeking a more relaxed, wavy look rather than tight and uniform curls. The beach wave perm is designed to create effortless, beachy waves that mimic the look of naturally tousled hair after a day at the beach. It produces loose, relaxed curls with subtle volume, making it a popular choice among those looking for a low-maintenance, carefree hairstyle. The spiral perm is characterized by tight, springy curls that create a dramatic and voluminous effect. It involves wrapping the hair around small rods in a spiral pattern, resulting in long-lasting, defined curls. Spiral perms are suitable for those seeking a bold…

Oily Skin Makeup Tips And Tricks Bid Farewell To Unwanted Shine 11
Oily Skin Makeup Tips and Tricks: Bid Farewell to Unwanted Shine

Oily skin can be a makeup lover’s nemesis. The constant battle against shine, makeup sliding off, and clogged pores can be frustrating. However, with the right knowledge and techniques, you can achieve a matte and flawless look that lasts all day. In this comprehensive guide, we will delve into the world of makeup for oily skin, providing you with a wealth of tips, tricks, and product recommendations to help you say goodbye to unwanted shine and embrace a fresh, matte complexion. Understanding Oily Skin Before we jump into makeup tips, it’s essential to understand what causes oily skin. Oily skin is the result of an overproduction of sebum, the skin’s natural oil. This overproduction can be influenced by factors such as genetics, hormonal fluctuations, and environmental conditions. Oily skin tends to have larger pores and can be prone to acne and blackheads. When applying makeup to oily skin, the goal is to control excess oil production while maintaining a natural, matte finish. Prepping Your Canvas: Skincare for Oily Skin Effective makeup for oily skin begins with proper skincare. A well-balanced skincare routine can help control excess oil, minimize pores, and create a smoother canvas for makeup application. Here are some skincare steps tailored to oily skin: Choosing the Right Makeup Products Selecting makeup products that are specifically formulated for oily skin is crucial. Look for the following characteristics when choosing makeup products: Prepping Your Skin for Makeup Properly prepping your skin before makeup application is crucial for long-lasting results. Follow these steps to ensure your makeup adheres well to your oily skin: Foundation for Oily Skin Choosing the right foundation is crucial for achieving a matte and long-lasting makeup look for oily skin. Here’s how to do it: Concealer and Contouring When it comes to concealer and contouring for oily skin, choose products that are matte, long-wear, and non-comedogenic. Here are some tips: Eye Makeup for Oily Skin Eye makeup can be particularly challenging for those with oily skin, as creasing and smudging are common issues. Here’s how to make your eye makeup last: Lip Makeup for Oily Skin When it comes to lip makeup, oily skin individuals can enjoy a wide range of options. Here are some tips for long-lasting lip color: Setting Your Makeup To lock in your makeup and keep it shine-free, setting your makeup is essential. Here’s how: Makeup Removal and Skincare at Night Proper makeup removal and nighttime skincare are crucial for maintaining healthy skin, especially if you have oily skin. Here’s a nighttime routine tailored to your needs: With the right makeup products and techniques, individuals with oily skin can achieve a matte, long-lasting makeup look that stays fresh throughout the day. The key is to focus on oil-free, matte formulas, proper skincare, and setting your makeup effectively. Embrace these tips and tricks, and say goodbye to unwanted shine. Remember that makeup is a form of self-expression, and with a little practice, you can confidently showcase your unique style while keeping oiliness at bay. Enjoy your journey to a shine-free and flawless complexion!

The Ultimate Guide To Cleaning Your Makeup Brushes: Tips, Tricks, And Techniques
The Ultimate Guide to Cleaning Your Makeup Brushes: Tips, Tricks, and Techniques

Makeup brushes are an essential tool in any beauty routine. They help us achieve flawless and effortless makeup looks, whether we’re going for a natural or dramatic look. However, it’s important to note that these brushes need to be cleaned regularly to maintain their performance and longevity. Dirty brushes can harbor bacteria, oil, dirt, and dead skin cells that can cause breakouts and other skin problems. Cleaning your makeup brushes may seem like a daunting task, but it’s actually quite simple and easy to do. With the right tools and techniques, you can keep your brushes clean and in good condition for years to come. In this article, we’ll walk you through the step-by-step process of cleaning your makeup brushes, as well as some tips and tricks to make the process even easier. Step 1: Gather Your Supplies Before you start cleaning your makeup brushes, you’ll need to gather some supplies. Here are the things you’ll need: Gentle liquid soap or brush cleaner: You can use any gentle liquid soap or brush cleaner to clean your brushes. Avoid using harsh soaps or detergents as they can damage the bristles. Bowl or sink: You’ll need a bowl or sink to clean your brushes in. Make sure it’s clean and free from any dirt or debris. Towel: You’ll need a clean towel to dry your brushes on. Brush cleaning mat or glove (optional): A brush cleaning mat or glove can help you get a deeper clean on your brushes by helping to remove dirt and makeup residue. Step 2: Wet Your Brushes To start cleaning your makeup brushes, wet the bristles under running water. Make sure the water is lukewarm and not too hot or too cold. Hold the brush under the water with the bristles facing down, and avoid getting water on the metal part of the brush as it can loosen the glue that holds the bristles in place. Step 3: Clean Your Brushes Once your brushes are wet, it’s time to clean them. You can use a gentle liquid soap or brush cleaner for this step. Put a small amount of soap or cleaner into your palm or onto a brush cleaning mat or glove. Swirl the brush into the soap or cleaner, making sure to cover all the bristles. Gently massage the bristles with your fingers, working the soap or cleaner into the brush. If you’re using a brush cleaning mat or glove, use the textured surface to help remove any dirt or makeup residue. Step 4: Rinse Your Brushes After you’ve cleaned your brushes, rinse them thoroughly under running water. Make sure all the soap or cleaner is rinsed out of the bristles. Keep rinsing the brushes until the water runs clear. Step 5: Dry Your Brushes Once you’ve rinsed your brushes, it’s time to dry them. Gently squeeze the excess water out of the bristles, then reshape the bristles with your fingers. Lay the brushes flat on a clean towel and let them air dry. Avoid drying your brushes upright as the water can seep down into the…

The Science Of Sacred Serums Targeted Skincare Products
The Science of Sacred Serums : Targeted Skincare Products

Skincare superheroes like serums have emerged to provide answers to different skin concerns. There is a serum for pimples, aging skin and dehydration – there is a system for you. Mastering the science behind these effective elixirs will help you make a wise decision for your skin care regimen. Discover the science of the serum – the appeal of the serum and how you can unleash your skin’s potential. Serums: What exactly are Serums? Serums are sheer skincare products which provide very high concentrations of active ingredients deeply within the skin. Unlike moisturizers which just plough the epidermis surface area, serums penetrate deeper and will specifically target wrinkles, dullness or hyperpigmentation. The Function of Serums in Skincare Routine Serums are essential products for any skincare regime as impressive treatment products targeting certain concerns. Including serums in your day to day routine will complement your skincare products and also offer targeted solutions to numerous skin problems. Benefits of Serums Serums possess many skin benefits and ought to be part of every skin kit. From encouraging collagen production to brightening complexion, here are a number of crucial advantages of integrating serums in your daily regime : Hydration: Serum components like hyaluronic acid and glycerin are oftentimes contained in serums as these ingredients bind and retain water, making skin plump and moist.Anti Aging: Antioxidant serums with retinol and vitamin C might fight fine lines and wrinkles.Brightening: Active substances like niacinamide and kojic acid much skin tones and also give it a far more radiance.Control of Acne: Salicylic acid or tea tree oil serums clean oil blocked pores, minimize redness and prevent breakouts – ideal for acne prone skin. Which Serum Is Best There are plenty of serums available today – selecting the best one may be overwhelming. Add in the following to select the serum which best suits your requirements : Skin Type: There is a serum for oily, dry, sexy and very sensitive skin – there is one for you. Search for items made for you.Ingredients: Look at the active ingredients within the serum and at their concentrations. Research ingredients which deal with your concerns and select items with quality, scientifically evaluated formulations.Texture: Serums may be light liquids or solid gels. Pick a texture which feels at ease in your skin and goes with your skin care regime.Packaging: Select serums in oblong, airtight bottles to keep the active ingredients constant and good in light and air exposure. Application Techniques Appropriate use of serums is crucial to maximising their effectiveness and getting the most from them for your skin. Stick to these steps for optimum results : Cleanse: Begin with a fresh and dried out face for optimum absorption of the serum.Dispense: Slather a pea size drop of serum onto fingers.Pat and Press: Pat the serum on trouble areas of skin. Don’t rub or even pull at your skin to result in irritation. Follow with Moisturizer: Soak the serum in before using moisturizer to retain hydration and lock in effective ingredients. Common Ingredients in Serums Serums focus on certain skin issues with active ingredients. Listed…

 Heart Shaped Face 2
Unveiling Elegance: Mastering Makeup Techniques for the Heart-Shaped Face

A heart-shaped face is characterized by a broad forehead, high cheekbones, and a delicate pointed chin. This unique facial structure possesses a natural grace that can be accentuated with the right makeup techniques. Whether you’re aiming to soften your angles, highlight your best features, or create a balanced look, understanding the art of makeup application is key. In this comprehensive guide, we’ll delve into tailored makeup tips and techniques that will enhance the beauty of your heart-shaped face, ensuring you radiate confidence and elegance. Understanding the Heart-Shaped Face Before embarking on makeup application, it’s essential to understand the nuances of the heart-shaped face. Key features include: With this understanding, you can strategically use makeup to balance your features and highlight your best attributes. Creating a Flawless Canvas A well-prepped canvas is essential for any makeup look. Follow these steps to create the perfect base for your makeup: Contouring and Highlighting Contouring and highlighting help balance the features of a heart-shaped face. Follow these techniques: Eye Makeup Techniques Eyes are a focal point of any makeup look. Consider these tips to complement your heart-shaped face: Lip Makeup Recommendations Lips are another feature you can play up to create harmony on your heart-shaped face: Blush Application Blush can add warmth and dimension to your heart-shaped face: Final Touches Complete your makeup look with these final touches: Conclusion The art of makeup is a wonderful tool to enhance your natural beauty, and understanding the nuances of your heart-shaped face allows you to achieve a harmonious and balanced look. By employing techniques that soften angles, accentuate features, and create an overall sense of elegance, you can confidently embrace your unique facial structure. Remember that makeup is an exploration of creativity, so feel free to experiment and adapt these tips to suit your personal style and preferences. With the right makeup techniques, you can elevate your heart-shaped face’s inherent beauty and showcase your radiant confidence to the world.

What Is Eyelashserum
What is Eyelash Serum?

Eyelash serum has emerged as a cornerstone in the beauty routines of those aiming to achieve fuller, healthier, and more vibrant lashes. This detailed guide explores eyelash serums, their composition, how they work, and their benefits, providing you with essential knowledge to transform your lashes and enhance your natural beauty. The allure of luscious, thick eyelashes has long been a symbol of beauty and femininity. Eyelash serums are specifically formulated products designed to promote the health, length, and thickness of the lashes, offering a non-invasive solution to the common desire for more pronounced eyelashes. Defining Eyelash Serum Eyelash serums are potent formulations that contain active ingredients aimed at stimulating the growth and improving the overall condition of eyelashes. These serums are applied directly to the lash line and work over time to enhance lash appearance. Composition and Types Eyelash serums vary widely in their composition, with key ingredients often including peptides, vitamins, and natural extracts designed to nourish and strengthen lashes. There are both over-the-counter options and prescription-strength formulations available, each catering to different needs and sensitivities. How Does Eyelash Serum Work? Eyelash serums penetrate the hair follicles to stimulate growth from within. By nourishing and supporting the lash follicles, these serums can extend the growth phase of the lash cycle, leading to longer, fuller lashes. The Science Behind the Serum Active ingredients like biotin, peptides, and hyaluronic acid support keratin production, enhance follicle health, and provide moisture to the lashes, respectively. Expected Results and Timeline Results vary, but many users report noticeable improvement in lash length and density after 4 to 6 weeks of consistent use. Maximum effects are often observed after 3 to 4 months. Benefits of Using Eyelash Serum The regular application of eyelash serum can lead to enhanced growth, increased thickness, strength, and improved health and hydration of the eyelashes. This can reduce lash loss and breakage, contributing to a fuller lash line. How to Choose the Right Eyelash Serum Key Ingredients to Look For Look for serums containing peptides for growth, biotin for strengthening, and hyaluronic acid for hydration. These ingredients are crucial for promoting healthy, robust lashes. Understanding Different Formulas Choose a serum based on your specific needs—whether it’s for growth, strengthening, or moisture. Always perform a patch test to ensure you don’t have an allergic reaction to the product. Application Tips for Maximum Effectiveness Best Practices Apply the serum to clean, dry lashes once a day, ideally at night, to allow the serum to work overnight. Use a single stroke at the base of the upper eyelashes. Common Mistakes to Avoid Avoid applying too much product, which can lead to irritation. Ensure the serum doesn’t get into your eyes, and refrain from using multiple lash products simultaneously to avoid adverse reactions. Safety and Side Effects While eyelash serums are generally safe, potential risks include eye irritation, darkening of the eyelid skin, and, in rare cases, changes in iris color, particularly with prescription-strength formulas. Minimize complications by following the product’s instructions carefully and consulting with a healthcare provider if you have sensitive eyes or skin. What…

The Benefits And Risks Of Using Salicylic Acid For Skincare Routine
The Benefits and Risks of Using Salicylic Acid for Skincare Routine

Salicylic acid is a type of beta-hydroxy acid that is commonly used in skincare products to treat various skin conditions, including acne, blackheads, and whiteheads. It works by penetrating deep into the pores to dissolve and exfoliate dead skin cells, oil, and other impurities, thereby preventing clogged pores and reducing inflammation. In this article, we will discuss the benefits and risks of using salicylic acid for skincare routine. Benefits of Salicylic Acid for Skincare Routine Acne TreatmentSalicylic acid is one of the most effective ingredients for treating acne. It helps to unclog pores by removing dead skin cells, excess oil, and other impurities, thereby reducing the occurrence of acne. Salicylic acid also has anti-inflammatory properties that help to reduce redness and swelling associated with acne. Blackhead and Whitehead TreatmentBlackheads and whiteheads are caused by clogged pores. Salicylic acid helps to penetrate deep into the pores and dissolve the impurities that cause these types of blemishes. Regular use of salicylic acid can help to prevent the formation of blackheads and whiteheads. ExfoliationSalicylic acid is a natural exfoliant that helps to remove dead skin cells, leaving the skin looking brighter and smoother. It also helps to stimulate cell renewal, which can improve the texture and tone of the skin. Anti-aging BenefitsSalicylic acid can help to reduce the appearance of fine lines and wrinkles. It works by stimulating collagen production, which helps to improve the elasticity and firmness of the skin. Reduces the Appearance of PoresSalicylic acid can help to reduce the appearance of pores by unclogging them and removing excess oil and impurities. This can help to make the skin look smoother and more even. Risks of Salicylic Acid for Skincare Routine Skin IrritationSalicylic acid can cause skin irritation, especially if used in high concentrations or if you have sensitive skin. Symptoms of skin irritation may include redness, itching, and burning. It is important to start with a low concentration and gradually increase as tolerated. Dryness and PeelingSalicylic acid can cause dryness and peeling, especially if used in high concentrations or if you have dry or sensitive skin. It is important to use a moisturizer after applying salicylic acid to prevent dryness and peeling. Sun SensitivitySalicylic acid can make the skin more sensitive to the sun. It is important to use a sunscreen with a high SPF when using salicylic acid. Pregnancy and BreastfeedingSalicylic acid should be avoided during pregnancy and breastfeeding. There is a risk of harm to the developing fetus or infant. How to Use Salicylic Acid for Skincare Routine Start with a low concentration: If you are new to salicylic acid, it is important to start with a low concentration and gradually increase as tolerated. A concentration of 0.5% to 2% is usually effective for most people. Use it once or twice a week: Salicylic acid should be used once or twice a week, depending on your skin type and the concentration of the product. Use it at night: Salicylic acid can make the skin more sensitive to the sun, so it is best to use it at night. This will…